Chapter 3
Using GATE Developer [#]
‘The law of evolution is that the strongest survives!’
‘Yes; and the strongest, in the existence of any social species, are those who are most social. In human terms, most ethical. …There is no strength to be gained from hurting one another. Only weakness.’
The Dispossessed [p.183], Ursula K. le Guin, 1974.
This chapter introduces GATE Developer, which is the GATE graphical user interface. It is analogous to systems like Mathematica for mathematicians, or Eclipse for Java programmers, providing a convenient graphical environment for research and development of language processing software. As well as being a powerful research tool in its own right, it is also very useful in conjunction with GATE Embedded (the GATE API by which GATE functionality can be included in your own applications); for example, GATE Developer can be used to create applications that can then be embedded via the API. This chapter describes how to complete common tasks using GATE Developer. It is intended to provide a good entry point to GATE functionality, and so explanations are given assuming only basic knowledge of GATE. However, probably the best way to learn how to use GATE Developer is to use this chapter in conjunction with the demonstrations and tutorials movies. There are specific links to them throughout the chapter. There is also a complete new set of video tutorials here.
The basic business of GATE is annotating documents, and all the functionality we will introduce relates to that. Core concepts are;
- the documents to be annotated,
- corpora comprising sets of documents, grouping documents for the purpose of running uniform processes across them,
- annotations that are created on documents,
- annotation types such as ‘Name’ or ‘Date’,
- annotation sets comprising groups of annotations,
- processing resources that manipulate and create annotations on documents, and
- applications, comprising sequences of processing resources, that can be applied to a document or corpus.
What is considered to be the end result of the process varies depending on the task, but for the purposes of this chapter, output takes the form of the annotated document/corpus. Researchers might be more interested in figures demonstrating how successfully their application compares to a ‘gold standard’ annotation set; Chapter 10 in Part II will cover ways of comparing annotation sets to each other and obtaining measures such as F1. Implementers might be more interested in using the annotations programmatically; Chapter 7, also in Part II, talks about working with annotations from GATE Embedded. For the purposes of this chapter, however, we will focus only on creating the annotated documents themselves, and creating GATE applications for future use.
GATE includes a complete information extraction system that you are free to use, called ANNIE (a Nearly-New Information Extraction System). Many users find this is a good starting point for their own application, and so we will cover it in this chapter. Chapter 6 talks in a lot more detail about the inner workings of ANNIE, but we aim to get you started using ANNIE from inside of GATE Developer in this chapter.
We start the chapter with an exploration of the GATE Developer GUI, in Section 3.1. We describe how to create documents (Section 3.2) and corpora (Section 3.3). We talk about viewing and manually creating annotations (Section 3.4).
We then talk about loading the plugins that contain the processing resources you will use to construct your application, in Section 3.5. We then talk about instantiating processing resources (Section 3.7). Section 3.8 covers applications, including using ANNIE (Section 3.8.3). Saving applications and language resources (documents and corpora) is covered in Section 3.9. We conclude with a few assorted topics that might be useful to the GATE Developer user, in Section 3.11.
3.1 The GATE Developer Main Window [#]
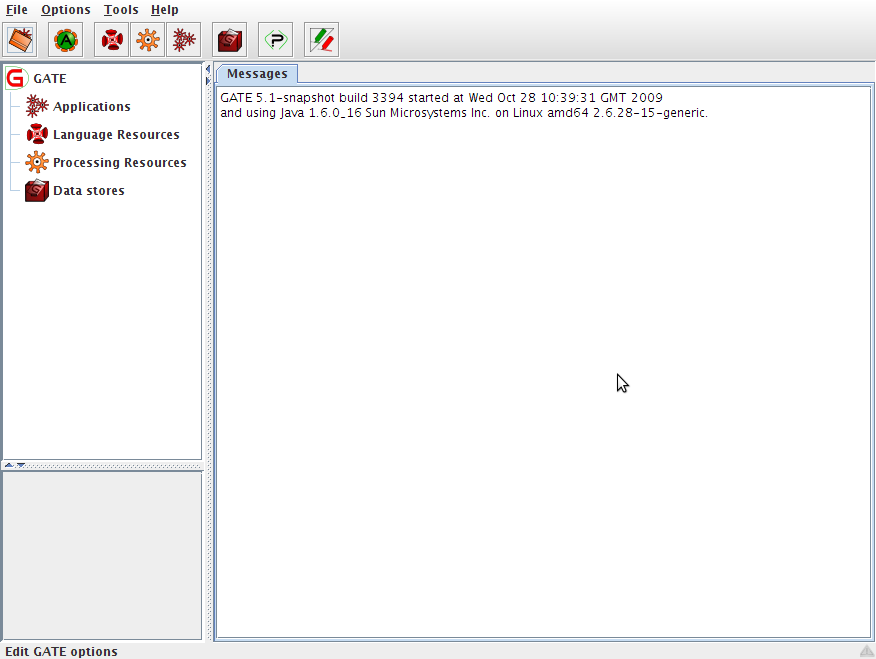
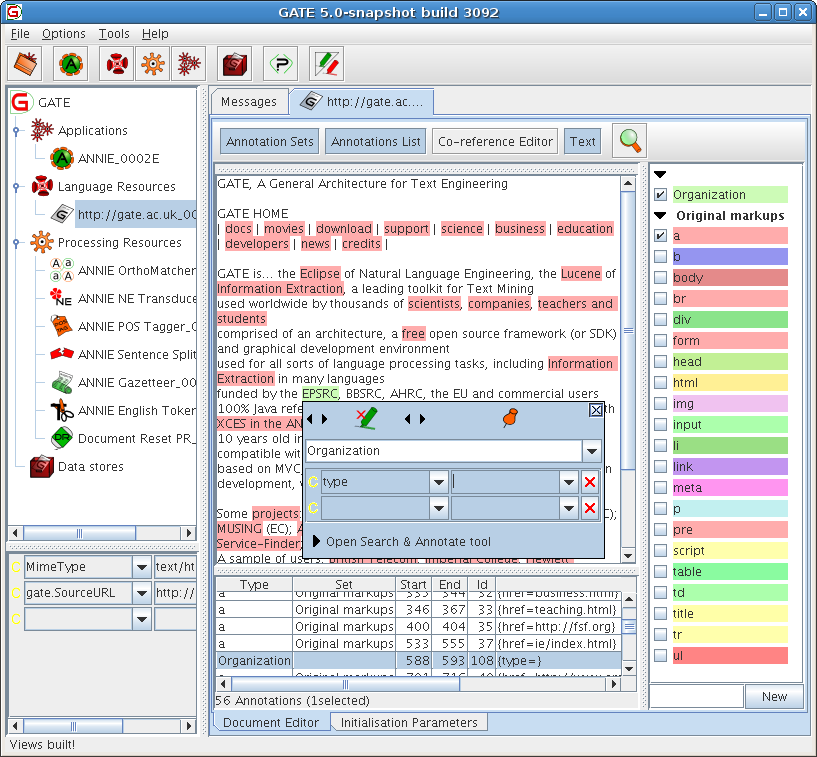
Figure 3.1 shows the main window of GATE Developer, as you will see it when you first run it. There are five main areas:
- at the top, the menus bar and tools bar with menus ‘File’, ‘Options’, ‘Tools’, ‘Help’ and icons for the most frequently used actions;
- on the left side, a tree starting from ‘GATE’ and containing ‘Applications’, ‘Language Resources’ etc. – this is the resources tree;
- in the bottom left corner, a rectangle, which is the small resource viewer;
- in the center, containing tabs with ‘Messages’ or the name of a resource from the resources tree, the main resource viewer;
- at the bottom, the messages bar.
The menu and the messages bar do the usual things. Longer messages are displayed in the messages tab in the main resource viewer area.
The resource tree and resource viewer areas work together to allow the system to display diverse resources in various ways. The many resources integrated with GATE can have either a small view, a large view, or both.
At any time, the main viewer can also be used to display other information, such as messages, by clicking on the appropriate tab at the top of the main window. If an error occurs in processing, the messages tab will flash red, and an additional popup error message may also occur.
In the options dialogue from the Options menu you can choose if you want to link the selection in the resources tree and the selected main view.
3.2 Loading and Viewing Documents [#]
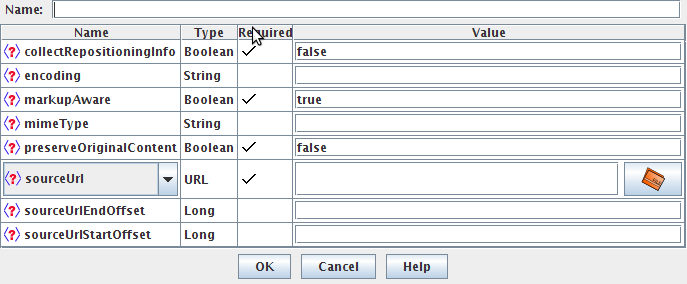
If you right-click on ‘Language Resources’ in the resources pane, select “New’ then ‘GATE Document’, the window ‘Parameters for the new GATE Document’ will appear as shown in figure 3.2. Here, you can specify the GATE document to be created. Required parameters are indicated with a tick. The name of the document will be created for you if you do not specify it. Enter the URL of your document or use the file browser to indicate the file you wish to use for your document source. For example, you might use ‘http://gate.ac.uk’, or browse to a text or XML file you have on disk. Click on ‘OK’ and a GATE document will be created from the source you specified.
See also the movie for creating documents.
The document editor is contained in the central tabbed pane in GATE Developer. Double-click on your document in the resources pane to view the document editor.
The document editor consists of a top panel with buttons and icons that control the display of different views and the search box. Initially, you will see just the text of your document, as shown in figure 3.3. Click on ‘Annotation Sets’ and ‘Annotations List’ to view the annotation sets to the right and the annotations list at the bottom.
You will see a view similar to figure 3.4. In place of the annotations list, you can also choose to see the annotations stack. In place of the annotation sets, you can also choose to view the co-reference editor. More information about this functionality is given in Section 3.4.
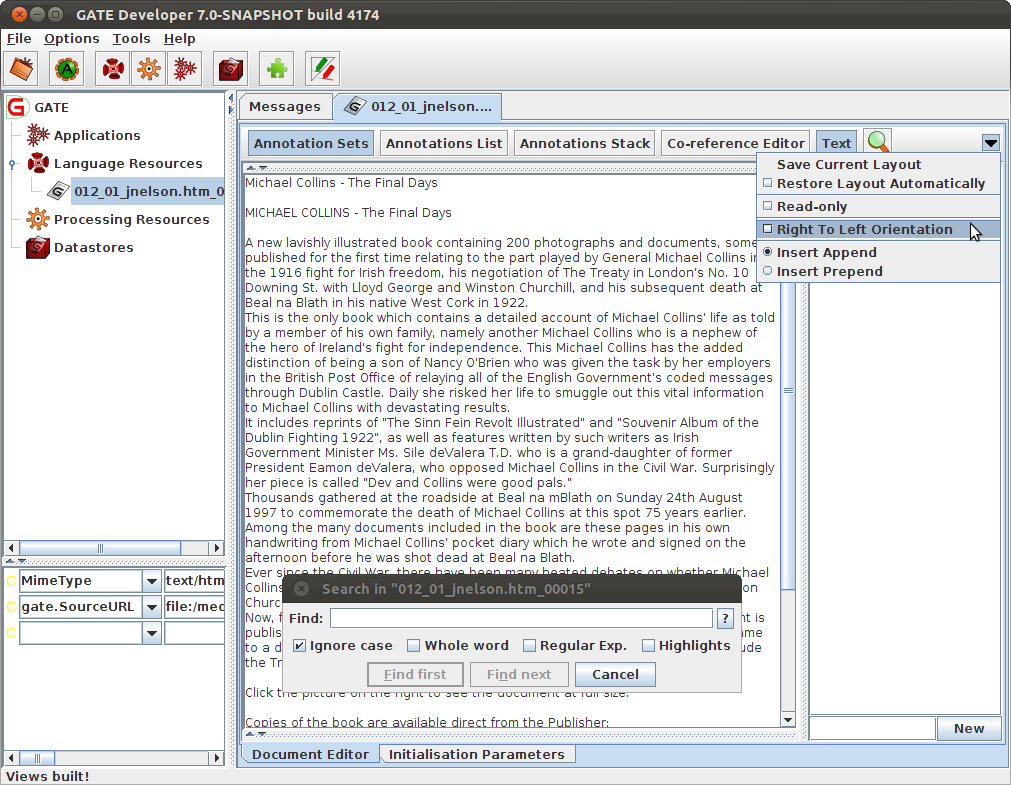
Several options can be set from the small triangle icon at the top right corner.
With ‘Save Current Layout’ you store the way the different views are shown and the annotation types highlighted in the document. Then if you set ‘Restore Layout Automatically’ you will get the same views and annotation types each time you open a document. The layout is saved to the user preferences file, gate.xml. It means that you can give this file to a new user so s/he will have a preconfigured document editor.
Another setting make the document editor ‘Read-only’. If enabled, you won’t be able to edit the text but you will still be able to edit annotations. It is useful to avoid to involuntarily modify the original text.
The option ‘Right To Left Orientation’ is useful for changing orientation of the text for the languages such as Arabic and Urdu. Selecting this option changes orientation of the text of the currently visible document.
Finally you can choose between ‘Insert Append’ and ‘Insert Prepend’. That setting is only relevant when you’re inserting text at the very border of an annotation.
If you place the cursor at the start of an annotation, in one case the newly entered text will become part of the annotation, in the other case it will stay outside. If you place the cursor at the end of an annotation, the opposite will happen.
Let use this sentence: ‘This is an [annotation].’ with the square brackets [] denoting the boundaries of the annotation. If we insert a ‘x’ just before the ‘a’ or just after the ‘n’ of ‘annotation’, here’s what we get:
Append
- This is an x[annotation].
- This is an [annotationx].
Prepend
- This is an [xannotation].
- This is an [annotation]x.
Text in a loaded document can be edited in the document viewer. The usual platform specific cut, copy and paste keyboard shortcuts should also work, depending on your operating system (e.g. CTRL-C, CTRL-V for Windows). The last icon, a magnifying glass, at the top of the document editor is for searching in the document. To prevent the new annotation windows popping up when a piece of text is selected, hold down the CTRL key. Alternatively, you can hide the annotation sets view by clicking on its button at the top of the document view; this will also cause the highlighted portions of the text to become un-highlighted.
See also Section 19.2.3 for the compound document editor.
3.3 Creating and Viewing Corpora [#]
You can create a new corpus in a similar manner to creating a new document; simply right-click on ‘Language Resources’ in the resources pane, select ‘New’ then ‘GATE corpus’. A brief dialogue box will appear in which you can optionally give a name for your corpus (if you leave this blank, a corpus name will be created for you) and optionally add documents to the corpus from those already loaded into GATE.
There are three ways of adding documents to a corpus:
- When creating the corpus, clicking on the icon next to the “documentsList” input field brings up a popup window with a list of the documents already loaded into GATE Developer. This enables the user to add any documents to the corpus.
- Alternatively, the corpus can be loaded first, and documents added later by double clicking on the corpus and using the + and - icons to add or remove documents to the corpus. Note that the documents must have been loaded into GATE Developer before they can be added to the corpus.
- Once loaded, the corpus can be populated by right clicking on the corpus and selecting ‘Populate’. With this method, documents do not have to have been previously loaded into GATE Developer, as they will be loaded during the population process. If you right-click on your corpus in the resources pane, you will see that you have the option to ‘Populate’ the corpus. If you select this option, you will see a dialogue box in which you can specify a directory in which GATE will search for documents. You can specify the extensions allowable; for example, XML or TXT. This will restrict the corpus population to only those documents with the extensions you wish to load. You can choose whether to recurse through the directories contained within the target directory or restrict the population to those documents contained in the top level directory. Click on ‘OK’ to populate your corpus. This option provides a quick way to create a GATE Corpus from a directory of documents.
Additionally, right-clicking on a loaded document in the tree and selecting the ‘New corpus with this document’ option creates a new transient corpus named Corpus for document name containing just this document.
See also the movie for creating and populating corpora.
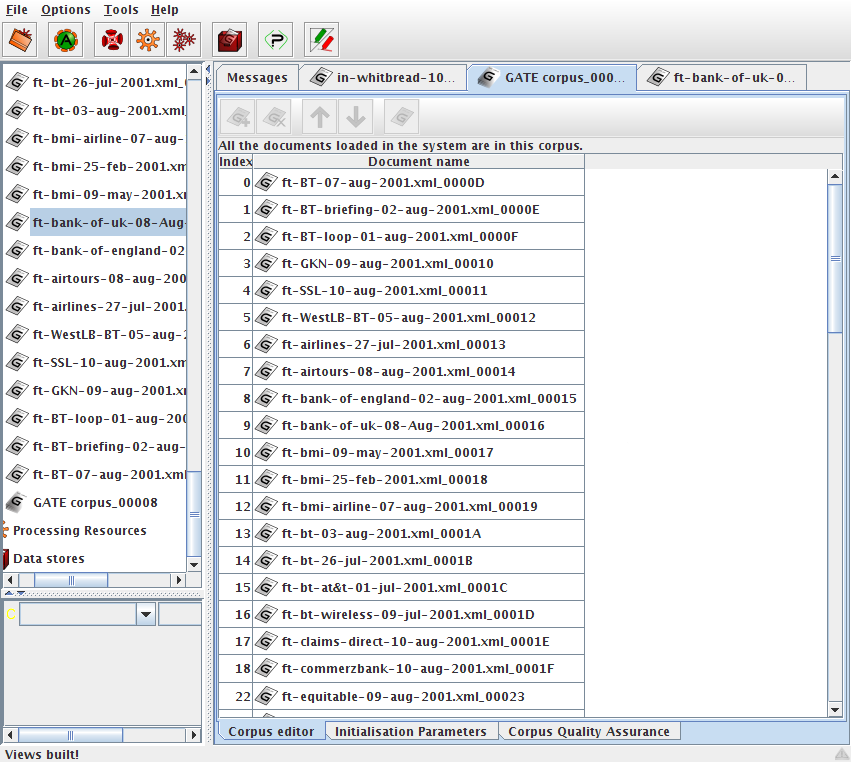
Double click on your corpus in the resources pane to see the corpus editor, shown in figure 3.5. You will see a list of the documents contained within the corpus.
In the top left of the corpus editor, plus and minus buttons allow you to add documents to the corpus from those already loaded into GATE and remove documents from the corpus (note that removing a document from a corpus does not remove it from GATE).
Up and down arrows at the top of the view allow you to reorder the documents in the corpus. The rightmost button in the view opens the currently selected document in a document editor.
At the bottom, you will see that tabs entitled ‘Initialisation Parameters’ and ‘Corpus Quality Assurance’ are also available in addition to the corpus editor tab you are currently looking at. Clicking on the ‘Initialisation Parameters’ tab allows you to view the initialisation parameters for the corpus. The ‘Corpus Quality Assurance’ tab allows you to calculate agreement measures between the annotations in your corpus. Agreement measures are discussed in depth in Chapter 10. The use of corpus quality assurance is discussed in Section 10.3.
3.4 Working with Annotations [#]
In this section, we will talk in more detail about viewing annotations, as well as creating and editing them manually. As discussed in at the start of the chapter, the main purpose of GATE is annotating documents. Whilst applications can be used to annotate the documents entirely automatically, annotation can also be done manually, e.g. by the user, or semi-automatically, by running an application over the corpus and then correcting/adding new annotations manually. Section 3.4.5 focuses on manual annotation. In Section 3.7 we talk about running processing resources on our documents. We begin by outlining the functionality around viewing annotations, organised by the GUI area to which the functionality pertains.
3.4.1 The Annotation Sets View [#]
To view the annotation sets, click on the ‘Annotation Sets’ button at the top of the document editor, or use the F3 key (see Section 3.10 for more keyboard shortcuts). This will bring up the annotation sets viewer, which displays the annotation sets available and their corresponding annotation types.
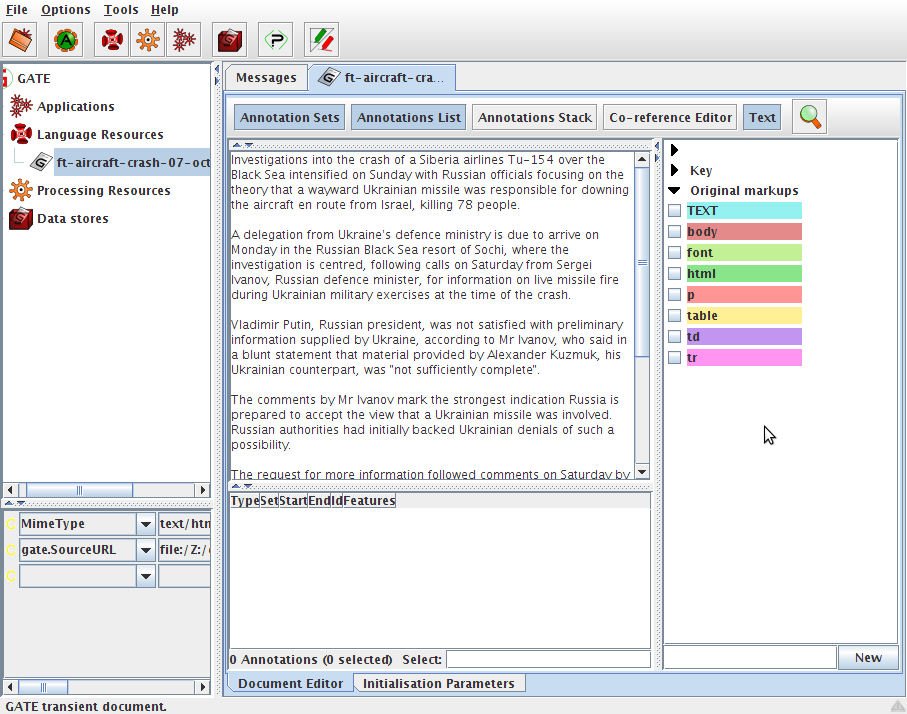
The annotation sets view is displayed on the left part of the document editor. It’s a tree-like view with a root for each annotation set. The first annotation set in the list is always a nameless set. This is the default annotation set. You can see in figure 3.4 that there is a drop-down arrow with no name beside it. Other annotation sets on the document shown in figure 3.4 are ‘Key’ and ‘Original markups’. Because the document is an XML document, the original XML markup is retained in the form of an annotation set. This annotation set is expanded, and you can see that there are annotations for ‘TEXT’, ‘body’, ‘font’, ‘html’, ‘p’, ‘table’, ‘td’ and ‘tr’.
To display all the annotations of one type, tick its checkbox or use the space key. The text segments corresponding to these annotations will be highlighted in the main text window. To delete an annotation type, use the delete key. To change the color, use the enter key. There is a context menu for all these actions that you can display by right-clicking on one annotation type, a selection or an annotation set.
If you keep shift key pressed when you open the annotation sets view, GATE Developer will try to select any annotations that were selected in the previous document viewed (if any); otherwise no annotation will be selected.
Having selected an annotation type in the annotation sets view, hovering over an annotation in the main resource viewer or right-clicking on it will bring up a popup box containing a list of the annotations associated with it, from which one can select an annotation to view in the annotation editor, or if there is only one, the annotation editor for that annotation. Figure 3.6 shows the annotation editor.
3.4.2 The Annotations List View [#]
To view the list of annotations and their features, click on the ‘Annotations list’ button at the top of the main window or use F4 key. The annotation list view will appear below the main text. It will only contain the annotations selected from the annotation sets view. These lists can be sorted in ascending and descending order for any column, by clicking on the corresponding column heading. Moreover you can hide a column by using the context menu by right-clicking on the column headings. Selecting rows in the table will blink the respective annotations in the document. Right-click on a row or selection in this view to delete or edit an annotation. Delete key is a shortcut to delete selected annotations.
3.4.3 The Annotations Stack View [#]
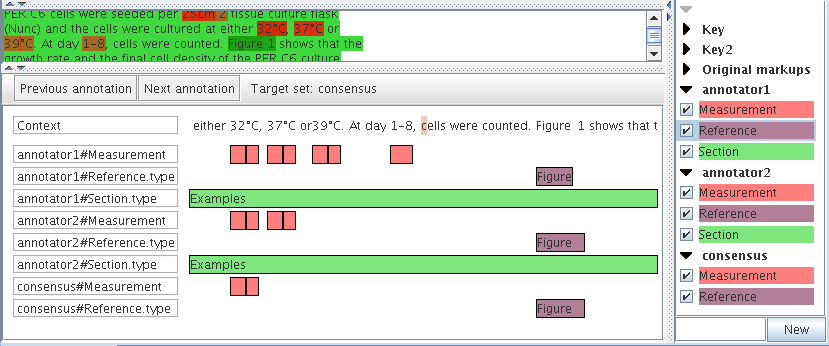
This view is similar to the ANNIC view described in section 9.2. It displays annotations at the document caret position with some context before and after. The annotations are stacked from top to bottom, which gives a clear view when they are overlapping.
As the view is centred on the document caret, you can use the conventional key to move it and update the view: notably the keys left and right to skip one letter; control + left/right to skip one word; up and down to go one line up or down; and use the document scrollbar then click in the document to move further.
There are two buttons at the top of the view that centre the view on the closest previous/next annotation boundary among all displayed. This is useful when you want to skip a region without annotation or when you want to reach the beginning or end of a very long annotation.
The annotation types displayed correspond to those selected in the annotation sets view. You can display feature values for an annotation rectangle by hovering the mouse on it or select only one feature to display by double-clicking on the annotation type in the first column.
Right-click on an annotation in the annotations stack view to edit it. Control-Shift-click to delete it. Double-click to copy it to another annotation set. Control-click on a feature value that contains an URL to display it in your browser.
All of these mouse shortcuts make it easier to create a gold standard annotation set.
3.4.4 The Co-reference Editor [#]
The co-reference editor allows co-reference chains (see Section 6.9) to be displayed and edited in GATE Developer. To display the co-reference editor, first open a document in GATE Developer, and then click on the Co-reference Editor button in the document viewer.
The combo box at the top of the co-reference editor allows you to choose which annotation set to display co-references for. If an annotation set contains no co-reference data, then the tree below the combo box will just show ‘Coreference Data’ and the name of the annotation set. However, when co-reference data does exist, a list of all the co-reference chains that are based on annotations in the currently selected set is displayed. The name of each co-reference chain in this list is the same as the text of whichever element in the chain is the longest. It is possible to highlight all the member annotations of any chain by selecting it in the list.
When a co-reference chain is selected, if the mouse is placed over one of its member annotations, then a pop-up box appears, giving the user the option of deleting the item from the chain. If the only item in a chain is deleted, then the chain itself will cease to exist, and it will be removed from the list of chains. If the name of the chain was derived from the item that was deleted, then the chain will be given a new name based on the next longest item in the chain.
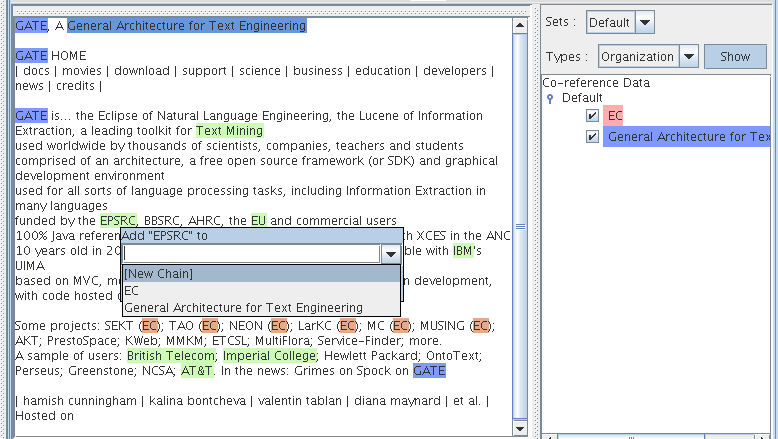
A combo box near the top of the co-reference editor allows the user to select an annotation type from the current set. When the Show button is selected all the annotations of the selected type will be highlighted. Now when the mouse pointer is placed over one of those annotations, a pop-up box will appear giving the user the option of adding the annotation to a co-reference chain. The annotation can be added to an existing chain by typing the name of the chain (as shown in the list on the right) in the pop-up box. Alternatively, if the user presses the down cursor key, a list of all the existing annotations appears, together with the option [New Chain]. Selecting the [New Chain] option will cause a new chain to be created containing the selected annotation as its only element.
Each annotation can only be added to a single chain, but annotations of different types can be added to the same chain, and the same text can appear in more than one chain if it is referenced by two or more annotations.
The movie for inspecting results is also useful for learning about viewing annotations.
3.4.5 Creating and Editing Annotations [#]
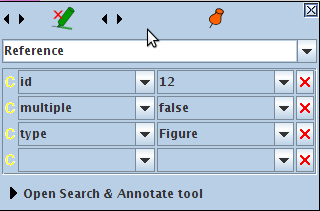
To create annotations manually, select the text you want to annotate and hover the mouse on the selection or use control+E keys. A popup will appear, allowing you to create an annotation, as shown in figure 3.9

The type of the annotation, by default, will be the same as the last annotation you created, unless there is none, in which case it will be ‘_New_’. You can enter any annotation type name you wish in the text box, unless you are using schema-driven annotation (see Section 3.4.6). You can add or change features and their values in the table below.
To delete an annotation, click on the red X icon at the top of the popup window. To grow/shrink the span of the annotation at its start use the two arrow icons on the left or right and left keys. Use the two arrow icons next on the right to change the annotation end or alt+right and alt+left keys. Add shift and control+shift keys to make the span increment bigger. The red X icon is for removing the annotation.
The pin icon is to pin the window so that it remains where it is. If you drag and drop the window, this automatically pins it too. Pinning it means that even if you select another annotation (by hovering over it in the main resource viewer) it will still stay in the same position.
The popup menu only contains annotation types present in the Annotation Schema and those already listed in the relevant Annotation Set. To create a new Annotation Schema, see Section 3.4.6. The popup menu can be edited to add a new annotation type, however.
The new annotation created will automatically be placed in the annotation set that has been selected (highlighted) by the user. To create a new annotation set, type the name of the new set to be created in the box below the list of annotation sets, and click on ‘New’.
Figure 3.10 demonstrates adding a ‘Organization’ annotation for the string ‘EPSRC’ (highlighted in green) to the default annotation set (blank name in the annotation set view on the right) and a feature name ‘type’ with a value about to be added.
To add a second annotation to a selected piece of text, or to add an overlapping annotation to an existing one, press the CTRL key to avoid the existing annotation popup appearing, and then select the text and create the new annotation. Again by default the last annotation type to have been used will be displayed; change this to the new annotation type. When a piece of text has more than one annotation associated with it, on mouseover all the annotations will be displayed. Selecting one of them will bring up the relevant annotation popup.
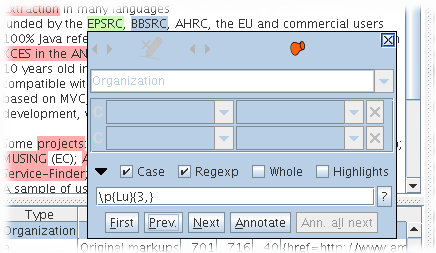
To search and annotate the document automatically, use the search and annotate function as shown in figure 3.11:
- Create and/or select an annotation to be used as a model to annotate.
- Open the panel at the bottom of the annotation editor window.
- Change the expression to search if necessary.
- Use the [First] button or Enter key to select the first expression to annotate.
- Use the [Annotate] button if the selection is correct otherwise the [Next] button. After a few cycles of [Annotate] and [Next], Use the [Ann. all next] button.
Note that after using the [First] button you can move the caret in the document and use the [Next] button to avoid continuing the search from the beginning of the document. The [?] button at the end of the search text field will help you to build powerful regular expressions to search.
3.4.6 Schema-Driven Editing [#]
Annotation schemas allow annotation types and features to be pre-specified, so that during manual annotation, the relevant options appear on the drop-down lists in the annotation editor. You can see some example annotation schemas in Section 5.4.1. Annotation schemas provide a means to define types of annotations in GATE Developer. Basically this means that GATE Developer ‘knows about’ annotations defined in a schema.
Annotation schemas are supported by the ‘Annotation schema’ language resource in ANNIE, so to use them you must first ensure that the ‘ANNIE’ plugin is loaded (see Section 3.5). This will load a set of default schemas, as well as allowing you to load schemas of your own.
The default annotation schemas contain common named entities such as Person, Organisation, Location, etc. You can modify the existing schema or create a new one, in order to tell GATE Developer about other kinds of annotations you frequently use. You can still create annotations in GATE Developer without having specified them in an annotation schema, but you may then need to tell GATE Developer about the properties of that annotation type each time you create an annotation for it.
To load a schema of your own, right-click on ‘Language Resources’ in the resources pane. Select ‘New’ then ‘Annotation schema’. A popup box will appear in which you can browse to your annotation schema XML file.
An alternative annotation editor component is available which constrains the available annotation types and features much more tightly, based on the annotation schemas that are currently loaded. This is particularly useful when annotating large quantities of data or for use by less skilled users.
To use this, you must load the Schema_Annotation_Editor plugin. With this plugin loaded, the annotation editor will only offer the annotation types permitted by the currently loaded set of schemas, and when you select an annotation type only the features permitted by the schema are available to edit1. Where a feature is declared as having an enumerated type the available enumeration values are presented as an array of buttons, making it easy to select the required value quickly.
3.4.7 Printing Text with Annotations [#]
We suggest you to use your browser to print a document as GATE don’t propose a printing facility for the moment.
First save your document by right clicking on the document in the left resources tree then choose ‘Save Preserving Format’. You will get an XML file with all the annotations highlighted as XML tags plus the ‘Original markups’ annotations set.
It’s possible that the output will not have an XML header and footer because the document was created from a plain text document. In that case you can use the XHTML example below.
Then add a stylesheet processing instruction at the beginning of the XML file, the second line in the following minimalist XHTML document:
<?xml-stylesheet type="text/css" href="gate.css"?>
<!DOCTYPE html
PUBLIC "-//W3C//DTD XHTML 1.0 Strict//EN"
"http://www.w3.org/TR/xhtml1/DTD/xhtml1-strict.dtd">
<html xmlns="http://www.w3.org/1999/xhtml" xml:lang="en" lang="en">
<head>
<title>Virtual Library</title>
</head>
<body>
<p>Content of the document</p>
...
</body>
</html>
And create a file ‘gate.css’ in the same directory:
P, p { display: block } /* or any other paragraph tag */
/* ANNIE tags but you can use whatever tags you want */
/* be careful that XML tags are case sensitive */
Date { background-color: rgb(230, 150, 150) }
FirstPerson { background-color: rgb(150, 230, 150) }
Identifier { background-color: rgb(150, 150, 230) }
JobTitle { background-color: rgb(150, 230, 230) }
Location { background-color: rgb(230, 150, 230) }
Money { background-color: rgb(230, 230, 150) }
Organization { background-color: rgb(230, 200, 200) }
Percent { background-color: rgb(200, 230, 200) }
Person { background-color: rgb(200, 200, 230) }
Title { background-color: rgb(200, 230, 230) }
Unknown { background-color: rgb(230, 200, 230) }
Etc { background-color: rgb(230, 230, 200) }
/* The next block is an example for having a small tag
with the name of the annotation type after each annotation */
Date:after {
content: "Date";
font-size: 50%;
vertical-align: sub;
color: rgb(100, 100, 100);
}
Finally open the XML file in your browser and print it.
Note that overlapping annotations, cannot be expressed correctly with inline XML tags and thus won’t be displayed correctly.
3.5 Using CREOLE Plugins [#]
In GATE, processing resources are used to automatically create and manipulate annotations on documents. We will talk about processing resources in the next section. However, we must first introduce CREOLE plugins. In most cases, in order to use a particular processing resource (and certain language resources) you must first load the CREOLE plugin that contains it. This section talks about using CREOLE plugins. Then, in Section 3.7, we will talk about creating and using processing resources.
The definitions of CREOLE resources (e.g. processing resources such as taggers and parsers, see Chapter 4) are stored in CREOLE directories (directories containing an XML file describing the resources, the Java archive with the compiled executable code and whatever libraries are required by the resources).
Plugins can have one or more of the following states in relation with GATE:
- known
- plugins are those plugins that the system knows about. These include all the plugins in the plugins directory of the GATE installation and those installed in the user’s own plugin directory (the so–called installed plugins) as well all the plugins that were manually loaded from the user interface.
- loaded
- plugins are the plugins currently loaded in the system. All CREOLE resource types from the loaded plugins are available for use. All known plugins can easily be loaded and unloaded using the user interface.
- auto-loadable
- plugins are the list of plugins that the system loads automatically during initialisation which can be configured via the load.plugin.path system property.
As hinted at above plugnis can be loaded from numerous sources:
- core plugins
- are distributed with GATE are found in the
t plugins directory of the instillation, although the default location can be modified using the gate.plugins.home system property. - user plugins
- are plugins that have been installed by the user into their personal plugins folder. The location of this folder can be set either through the configuration tab of the CREOLE manager interface or via the gate.user.plugins system property
- local plugins
- are those plugins located on disk but which aren’t in either the core plugins or user plugin folder.
- remote plugins
- are plugins which are loaded via http from a remote machine.
The CREOLE plugins can be managed through the graphical user interface which can be activated by selecting ‘Manage CREOLE Plugins’ from the ‘File’ menu. This will bring up a window listing all the known plugins. For each plugin there are two check-boxes – one labelled ‘Load Now’, which will load the plugin, and the other labelled ‘Load Always’ which will add the plugin to the list of auto-loadable plugins. A ‘Delete’ button is also provided – which will remove the plugin from the list of known plugins. This operation does not delete the actual plugin directory. Installed plugins are found automatically when GATE is started; if an installed plugin is deleted from the list, it will re-appear next time GATE is launched.
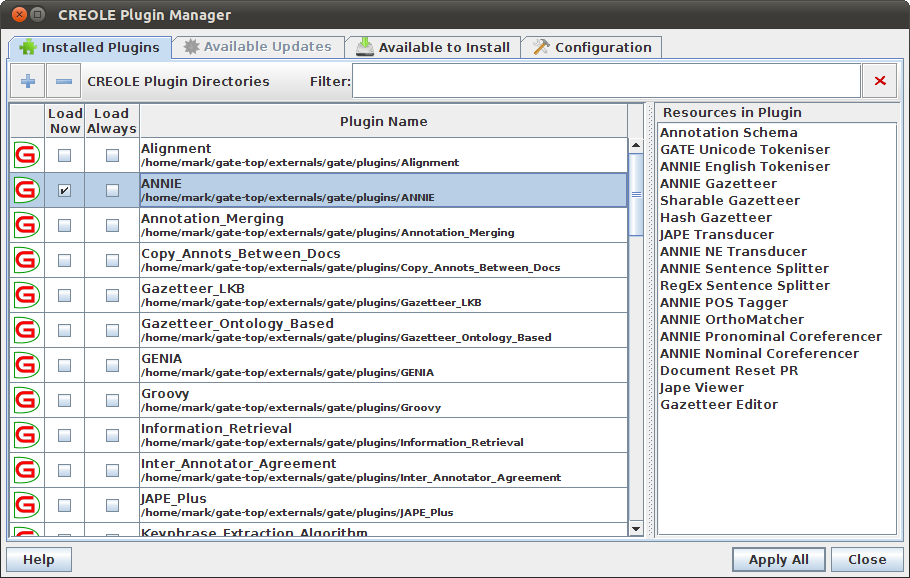
If you select a plugin, you will see in the pane on the right the list of resources that plugin contains. For example, in figure 3.12, the ‘ANNIE’ plugin is selected, and you can see that it contains 17 resources. If you wish to use a particular resource you will have to ascertain which plugin contains it. This list can be useful for that. Alternatively, the GATE website provides a directory of plugins and their processing resources.
Having loaded the plugins you need, the resources they define will be available for use. Typically, to the GATE Developer user, this means that they will appear on the ‘New’ menu when you right-click on ‘Processing Resources’ in the resources pane, although some special plugins have different effects; for example, the Schema_Annotation_Editor (see Section 3.4.6).
3.6 Installing and updating CREOLE Plugins [#]
While GATE is distributed with a number of core plugins (see Part III) there are many more plugins developed and made available by other GATE users. Some of these additional plugins can easily be installed into your local copy of GATE through the CREOLE plugin manager.
Plugin developers can offer their plugins by maintaining a plugin repository. The addresse of a plugin repository can then be added to your GATE installation through the configuration tab of the plugin manager. For example, in the following screenshot you can see that two plugin repositories have been added, although only one is currently enabled.
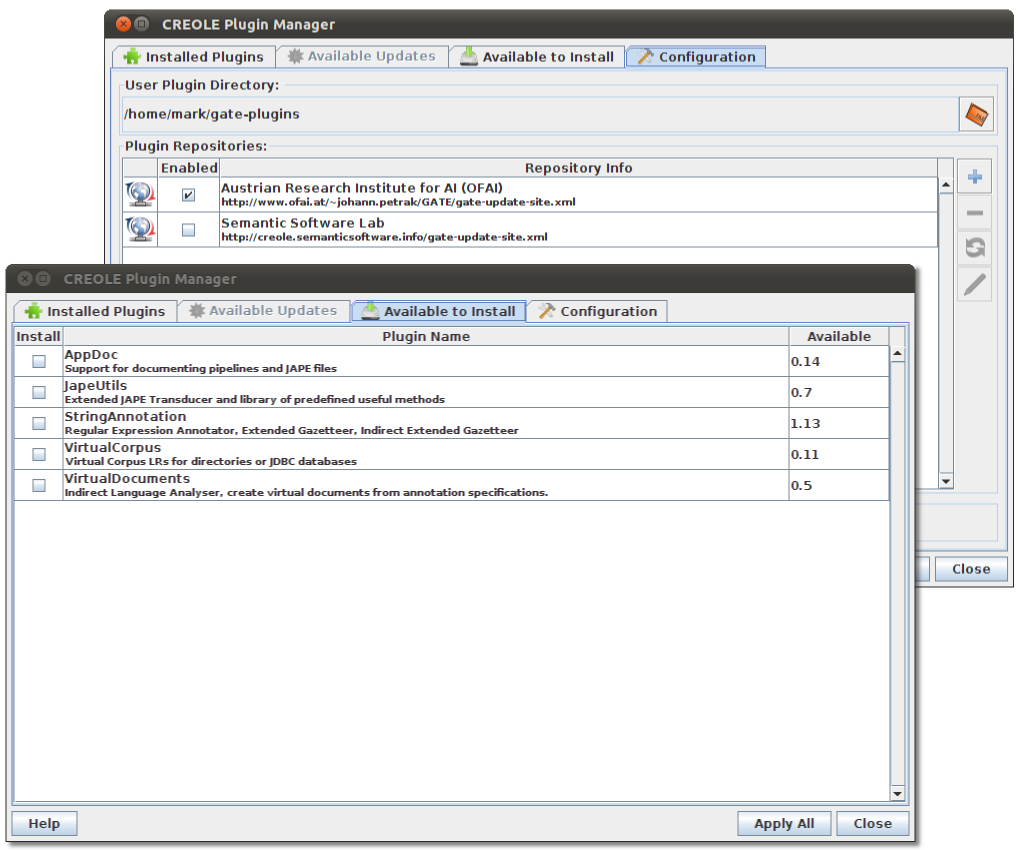
References to a number of plugin repositories are provided within the GATE distribution, although they are initially disabled2. Once a plugin repository is enabled the plugins which can be installed are listed on the ‘Available’ tab.
Installing new plugins is simply a case of checking the box and clicking ‘Apply All’. Note that plugins are installed into the user plugins directory, which must have been correctly configured before you can try installing new plugins.
Once a plugin is installed it will appear in the list of ‘Installed Plugins’ and can be loaded in the same way as any other CREOLE plugin (see Section 3.7). If a new version of a plugin you have installed becomes available the new version will be offered as an update. These updates can be installed in the same way as a new plugin.
3.7 Loading and Using Processing Resources [#]
This section describes how to load and run CREOLE resources not present in ANNIE. To load ANNIE, see Section 3.8.3. For technical descriptions of these resources, see the appropriate chapter in Part III (e.g. Chapter 21). First ensure that the necessary plugins have been loaded (see Section 3.5). If the resource you require does not appear in the list of Processing Resources, then you probably do not have the necessary plugin loaded. Processing resources are loaded by selecting them from the set of Processing Resources: right click on Processing Resources or select ‘New Processing Resource’ from the File menu.
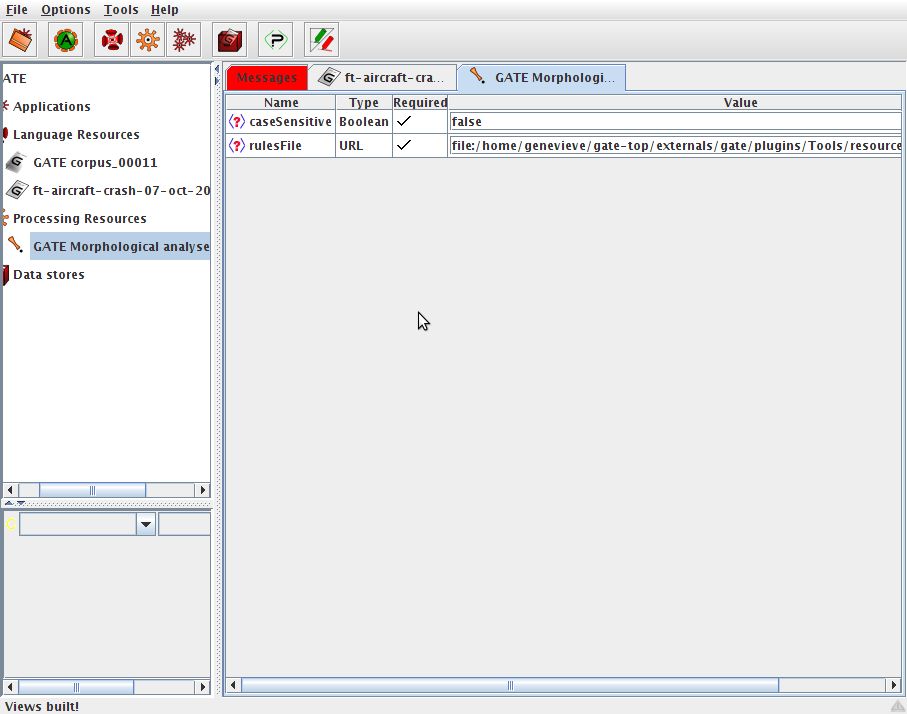
For example, use the Plugin Console Manager to load the ‘Tools’ plugin. When you right click on ‘Processing Resources’ in the resources pane and select ‘New’ you have the option to create any of the processing resources that plugin provides. You may choose to create a ‘GATE Morphological Analyser’, with the default parameters. Having done this, an instance of the GATE Morphological Analyser appears under ‘Processing Resources’. This processing resource, or PR, is now available to use. Double-clicking on it in the resources pane reveals its initialisation parameters, see figure 3.14.
This processing resource is now available to be added to applications. It must be added to an application before it can be applied to documents. You may create as many of a particular processing resource as you wish, for example with different initialisation parameters. Section 3.8 talks about creating and running applications.
See also the movie for loading processing resources.
3.8 Creating and Running an Application [#]
Once all the resources you need have been loaded, an application can be created from them, and run on your corpus. Right click on ‘Applications’ and select ‘New’ and then either ‘Corpus Pipeline’ or ‘Pipeline’. A pipeline application can only be run over a single document, while a corpus pipeline can be run over a whole corpus.
To build the pipeline, double click on it, and select the resources needed to run the application (you may not necessarily wish to use all those which have been loaded).
Transfer the necessary components from the set of ‘loaded components’ displayed on the left hand side of the main window to the set of ‘selected components’ on the right, by selecting each component and clicking on the left and right arrows, or by double-clicking on each component.
Ensure that the components selected are listed in the correct order for processing (starting from the top). If not, select a component and move it up or down the list using the up/down arrows at the left side of the pane.
Ensure that any parameters necessary are set for each processing resource (by clicking on the resource from the list of selected resources and checking the relevant parameters from the pane below). For example, if you wish to use annotation sets other than the Default one, these must be defined for each processing resource.
Note that if a corpus pipeline is used, the corpus needs only to be set once, using the drop-down menu beside the ‘corpus’ box. If a pipeline is used, the document must be selected for each processing resource used.
Finally, click on ‘Run’ to run the application on the document or corpus.
See also the movie for loading and running processing resources.
For how to use the conditional versions of the pipelines see Section 3.8.2 and for saving/restoring the configuration of an application see Section 3.9.3.
3.8.1 Running an Application on a Datastore [#]
To avoid loading all your documents at the same time you can run an application on a datastore corpus.
To do this you need to load your datastore, see section 3.9.2, and to load the corpus from the datastore by double clicking on it in the datastore viewer.
Then, in the application viewer, you need to select this corpus in the drop down list of corpora.
When you run the application on the corpus datastore, each document will be loaded, processed, saved then unloaded. So at any time there will be only one document from the datastore corpus loaded. This prevent memory shortage but is also a little bit slower than if all your documents were already loaded.
The processed documents are automatically saved back to the datastore so you may want to use a copy of the datastore to experiment.
Be very careful that if you have some documents from the datastore corpus already loaded before running the application then they will not be unloaded nor saved. To save such document you have to right click on it in the resources tree view and save it to the datastore.
3.8.2 Running PRs Conditionally on Document Features [#]
The ‘Conditional Pipeline’ and ‘Conditional Corpus Pipeline’ application types are conditional versions of the pipelines mentioned in Section 3.8 and allow processing resources to be run or not according to the value of a feature on the document. In terms of graphical interface, the only addition brought by the conditional versions of the applications is a box situated underneath the lists of available and selected resources which allows the user to choose whether the currently selected processing resource will run always, never or only on the documents that have a particular value for a named feature.
If the Yes option is selected then the corresponding resource will be run on all the documents processed by the application as in the case of non-conditional applications. If the No option is selected then the corresponding resource will never be run; the application will simply ignore its presence. This option can be used to temporarily and quickly disable an application component, for debugging purposes for example.
The If value of feature option permits running specific application components conditionally on document features. When selected, this option enables two text input fields that are used to enter the name of a feature and the value of that feature for which the corresponding processing resource will be run. When a conditional application is run over a document, for each component that has an associated condition, the value of the named feature is checked on the document and the component will only be used if the value entered by the user matches the one contained in the document features.
At first sight the conditional behaviour available with these controller may seem limited, but in fact it is very powerful when used in conjunction with JAPE grammars (see chapter 8). Complex conditions can be encoded in JAPE rules which set the appropriate feature values on the document for use by the conditional controllers. Alternatively, the Groovy plugin provides a scriptable controller (see section 7.17.3) in which the execution strategy is defined by a Groovy script, allowing much richer conditional behaviour to be encoded directly in the controller’s configuration.
3.8.3 Doing Information Extraction with ANNIE [#]
This section describes how to load and run ANNIE (see Chapter 6) from GATE Developer. ANNIE is a good place to start because it provides a complete information extraction application, that you can run on any corpus. You can then view the effects.
From the File menu, select ‘Load ANNIE System’. To run it in its default state, choose ‘with Defaults’. This will automatically load all the ANNIE resources, and create a corpus pipeline called ANNIE with the correct resources selected in the right order, and the default input and output annotation sets.
If ‘without Defaults’ is selected, the same processing resources will be loaded, but a popup window will appear for each resource, which enables the user to specify a name, location and other parameters for the resource. This is exactly the same procedure as for loading a processing resource individually, the difference being that the system automatically selects those resources contained within ANNIE. When the resources have been loaded, a corpus pipeline called ANNIE will be created as before.
The next step is to add a corpus (see Section 3.3), and select this corpus from the drop-down corpus menu in the Serial Application editor. Finally click on ‘Run’ from the Serial Application editor, or by right clicking on the application name in the resources pane and selecting ‘Run’. (Many people prefer to switch to the messages tab, then run their application by right-clicking on it in the resources pane, because then it is possible to monitor any messages that appear whilst the application is running.)
To view the results, double click on one of the document contained in the corpus processed in the left hand tree view. No annotation sets nor annotations will be shown until annotations are selected in the annotation sets; the ‘Default’ set is indicated only with an unlabelled right-arrowhead which must be selected in order to make visible the available annotations. Open the default annotation set and select some of the annotations to see what the ANNIE application has done.
See also the movie for loading and running ANNIE.
3.8.4 Modifying ANNIE [#]
You will find the ANNIE resources in gate/plugins/ANNIE/resources. Simply locate the existing resources you want to modify, make a copy with a new name, edit them, and load the new resources into GATE as new Processing Resources (see Section 3.7).
3.9 Saving Applications and Language Resources [#]
In this section, we will describe how applications and language resources can be saved for use outside of GATE and for use with GATE at a later time. Section 3.9.1 talks about saving documents to file. Section 3.9.2 outlines how to use datastores. Section 3.9.3 talks about saving application states (resource parameter states), and Section 3.9.4 talks about exporting applications together with referenced files and resources to a ZIP file.
3.9.1 Saving Documents to File [#]
There are three main ways to save annotated documents:
- preserving the original markup, with optional added annotations;
- in GATE’s own XML serialisation format (including all the annotations on the document);
- by writing your own dump algorithm as a processing resource.
This section describes how to use the first two options.
Both types of data export are available in the popup menu triggered by right-clicking on a document in the resources tree (see Section 3.1): type 1 is called ‘Save Preserving Format’ and type 2 is called ‘Save as XML’. In addition, all documents in a corpus can be saved as individual XML files into a directory by right-clicking on the corpus in the resources tree and choosing the option ‘Save as XML‘.
Selecting the save as XML option leads to a file open dialogue; give the name of the file you want to create, and the whole document and all its data will be exported to that file. If you later create a document from that file, the state will be restored. (Note: because GATE’s annotation model is richer than that of XML, and because our XML dump implementation sometimes cuts corners3, the state may not be identical after restoration. If your intention is to store the state for later use, use a DataStore instead.)
The ‘Save Preserving Format’ option also leads to a file dialogue; give a name and the data you require will be dumped into the file. The action can be used for documents that were created from files using the XML or HTML format. It will save all the original tags as well as the document annotations that are currently displayed in the ‘Annotations List’ view. This option is useful for selectively saving only some annotation types.
The annotations are saved as normal document tags, using the annotation type as the tag name. If the advanced option ‘Include annotation features for “Save Preserving Format”’ (see Section 2.4) is set to true, then the annotation features will also be saved as tag attributes.
Using this operation for GATE documents that were not created from an HTML or XML file results in a plain text file, with in-line tags for the saved annotations.
Note that GATE’s model of annotation allows graph structures, which are difficult to represent in XML (XML is a tree-structured representation format). During the dump process, annotations that cross each other in ways that cannot be represented in legal XML will be discarded, and a warning message printed.
3.9.2 Saving and Restoring LRs in Datastores [#]
Where corpora are large, the memory available may not be sufficient to have all documents open simultaneously. The datastore functionality provides the option to save documents to disk and open them only one at a time for processing. This means that much larger corpora can be used. A datastore can also be useful for saving documents in an efficient and lossless way.
To save a text in a datastore, a new datastore must first be created if one does not already exist. Create a datastore by right clicking on Datastore in the left hand pane, and select the option ‘Create Datastore’. Select the data store type you wish to use. Create a directory to be used as the datastore (note that the datastore is a directory and not a file).
You can either save a whole corpus to the datastore (in which case the structure of the corpus will be preserved) or you can save individual documents. The recommended method is to save the whole corpus. To save a corpus, right click on the corpus name and select the ‘Save to...’ option (giving the name of the datastore created earlier). To save individual documents to the datastore, right clicking on each document name and follow the same procedure.
To load a document from a datastore, do not try to load it as a language resource. Instead, open the datastore by right clicking on Datastore in the left hand pane, select ‘Open Datastore’ and choose the datastore to open. The datastore tree will appear in the main window. Double click on a corpus or document in this tree to open it. To save a corpus and document back to the same datastore, simply select the ‘Save’ option.
See also the movie for creating a datastore and the movie for loading corpus and documents from a datastore.
3.9.3 Saving Application States to a File [#]
Resources, and applications that are made up of them, are created based on the settings of their parameters (see Section 3.7). It is possible to save the data used to create an application to a file and re-load it later. To save the application to a file, right click on it in the resources tree and select ‘Save application state’, which will give you a file creation dialogue. Choose a file name that ends in gapp as this file dialog and the one for loading application states age displays all files which have a name ending in gapp. A common convention is to use .gapp as a file extension.
To restore the application later, select ‘Restore application from file’ from the ‘File’ menu.
Note that the data that is saved represents how to recreate an application – not the resources that make up the application itself. So, for example, if your application has a resource that initialises itself from some file (e.g. a grammar, a document) then that file must still exist when you restore the application.
In case you don’t want to save the corpus configuration associated with the application then you must select ‘<none>’ in the corpus list of the application before saving the application.
The file resulting from saving the application state contains the values of the initialisation and runtime parameters for all the processing resources contained by the stored application as well as the values of the initialisation parameters for all the language resources referenced by those processing resources. Note that if you reference a document that has been created with an empty URL and empty string content parameter and subsequently been manually edited to add content, that content will not be saved. In order for document content to be preserved, load the document from an URL, specify the content as for the string content parameter or use a document from a datastore.
For the parameters of type URL (which are typically used to select external resources such as grammars or rules files) a transformation is applied so that the paths are are stored relative to either the location of the saved application state file, the GATE home directory, or a special user resources home directory, according to the following rules:
- If the resource is inside the GATE home directory, but the the application state file is saved to a location outside the GATE home directory, the path is stored relative to the GATE home directory and the path marker $gatehome$ is used.
- If the property gate.user.resourceshome is set to the path of a directory and the resource is located inside that directory but the state file is saved to a location outside of this directory, the path is stored relative to this directory and the path marker $resourceshome$ is used.
- in all other situations, the path is stored relative to the location of the application state file location and the the path marker $relpath$ is used.
In this way, all resource files that are part of GATE are always used corretly, no matter where GATE is installed. Resource files which are not part of GATE and used by an application do not need to be in the same location as when the application was initially created but rather in the same location relative to the location of the application file. In addition if your application uses a project-specific location for global resources or project specific plugins, the java property gate.user.resourceshome can be set to this location and the application will be stored so that this location will also always be used correctly, no matter where the application state file is copied to. To set the resources home directory, the -rh location option for the Linux script gate.sh to start GATE can be used. The combination of these features allows the creation and deployment of portable applications by keeping the application file and the resource files used by the application together.
Note that GATE resources that are used by your application may change between different releases of GATE. If your application depends on a specific version of resources that come with the GATE distribution, consider copying them to your project directory in order to ensure the correct version is used. The option "Export for GATECloud.net" (see Section 3.9.4) supports this by creating a ZIP file that contains a copy all GATE resources used by the application, including GATE plugins.
When an application is restored from an application state file, GATE uses the keyword $relpath$ for paths relative to the location of the gapp file, $gatehome$ for paths relative to the GATE home installation directory and $resourceshom$ for paths relative to the the location the property gate.user.resourceshome is set. There exists other keywords that can be interesting in some cases. You will need to edit the gapp file manually. The keywords are $gateplugins$ and $sysprop:...$. The latter is any java system property, for example $sysprop:user.home$.
If you want to save your application along with all the resources it requires you can use the ‘Export for GATECloud.net’ option (see Section 3.9.4).
See also the movie for saving and restoring applications.
3.9.4 Saving an Application with its Resources (e.g. GATECloud.net) [#]
When you save an application using the ‘Save application state’ option (see Section 3.9.3), the saved file contains references to the plugins that were loaded when the application was saved, and to any resource files required by the application. To be able to reload the file, these plugins and other dependencies must exist at the same locations (relative to the saved state file). While this is fine for saving and loading applications on a single machine it means that if you want to package your application to run it elsewhere (e.g. deploy it to GATECloud.net) then you need to be careful to include all the resource files and plugins at the right locations in your package. The ‘Export for GATECloud.net’ option on the right-click menu for an application helps to automate this process.
When you export an application in this way, GATE Developer produces a ZIP file containing the saved application state (in the same format as ‘Save application state’). Any plugins and resource files that the application refers to are also included in the zip file, and the relative paths in the saved state are rewritten to point to the correct locations within the package. The resulting package is therefore self-contained and can be copied to another machine and unpacked there, or passed to GATECloud.net for deployment.
As well as selecting the location where you want to save the package, the ‘Export for GATECloud.net’ option will also prompt you to select the annotation sets that your application uses for input and output. For example, if your application makes use of the unpacked XML markup in source documents and creates annotations in the default set then you would select ‘Original markups’ as an input set and the ‘<Default annotation set>’ as an output set. GATE Developer will try to make an educated guess at the correct sets but you should check and amend the lists as necessary.
There are a few important points to note about the export process:
- The complete contents of all the plugin directories that are loaded when you perform the export will be included in the resulting package. Use the plugin manager to unload any plugins your application is not using before you export it.
- If your application refers to a resource file in a directory that is not under one of the loaded plugins, the entire contents of this directory will be recursively included in the package. If you have a number of unrelated resources in a single directory (e.g. many sets of large gazetteer lists) you may want to separate them into separate directories so that only the relevant ones are included in the package.
- The packager only knows about resources that your application refers to directly in its parameters. For example, if your application includes a multi-phase JAPE grammar the packager will only consider the main grammar file, not any of its sub-phases. If the sub-phases are not contained in the same directory as the main grammar you may find they are not included. If indirect references of this kind are all to files under the same directory as the ‘master’ file it will work OK.
If you require more flexibility than this option provides you should read Section E.2, which describes the underlying Ant task that the exporter uses.
3.10 Keyboard Shortcuts [#]
You can use various keyboard shortcuts for common tasks in GATE Developer. These are listed in this section.
General (Section 3.1):
- F1 Display a help page for the selected component
- Alt+F4 Exit the application without confirmation
- Tab Put the focus on the next component or frame
- Shift+Tab Put the focus on the previous component or frame
- F6 Put the focus on the next frame
- Shift+F6 Put the focus on the previous frame
- Alt+F Show the File menu
- Alt+O Show the Options menu
- Alt+T Show the Tools menu
- Alt+H Show the Help menu
- F10 Show the first menu
Resources tree (Section 3.1):
- Enter Show the selected resources
- Ctrl+H Hide the selected resource
- Ctrl+Shift+H Hide all the resources
- F2 Rename the selected resource
- Ctrl+F4 Close the selected resource
Document editor (Section 3.2):
- Ctrl+F Show the search dialog for the document
- Ctrl+E Edit the annotation at the caret position
- Ctrl+S Save the document in a file
- F3 Show/Hide the annotation sets
- Shift+F3 Show the annotation sets with preselection
- F4 Show/Hide the annotations list
- F5 Show/Hide the coreference editor
- F7 Show/Hide the text
Annotation editor (Section 3.4):
- Right/Left Grow/Shrink the annotation span at its start
- Alt+Right/Alt+Left Grow/Shrink the annotation span at its end
- +Shift/+Ctrl+Shift Use a span increment of 5/10 characters
- Alt+Delete Delete the currently edited annotation
Annic/Lucene datastore (Chapter 9):
- Alt+Enter Search the expression in the datastore
- Alt+Backspace Delete the search expression
- Alt+Right Display the next page of results
- Alt+Left Display the row manager
- Alt+E Export the results to a file
Annic/Lucene query text field (Chapter 9):
- Ctrl+Enter Insert a new line
- Enter Search the expression
- Alt+Top Select the previous result
- Alt+Bottom Select the next result
3.11 Miscellaneous [#]
3.11.1 Stopping GATE from Restoring Developer Sessions/Options [#]
GATE can remember Developer options and the state of the resource tree when it exits. The options are saved by default; the session state is not saved by default. This default behaviour can be changed from the ‘Advanced’ tab of the ‘Configuration’ choice on the ‘Options’ menu.
If a problem occurs and the saved data prevents GATE Developer from starting, you can fix this by deleting the configuration and session data files. These are stored in your home directory, and are called gate.xml and gate.sesssion or .gate.xml and .gate.sesssion depending on platform. On Windows your home is:
- 95, 98, NT:
- Windows Directory/profiles/username
- 2000, XP:
- Windows Drive/Documents and Settings/username
3.11.2 Working with Unicode [#]
GATE provides various facilities for working with Unicode beyond those that come as default with Java4:
- a Unicode editor with input methods for many languages;
- use of the input methods in all places where text is edited in the GUI;
- a development kit for implementing input methods;
- ability to read diverse character encodings.
1 using the editor:
In GATE Developer, select ‘Unicode editor’ from the ‘Tools’ menu. This will display an editor
window, and, when a language with a custom input method is selected for input (see next section),
a virtual keyboard window with the characters of the language assigned to the keys on the
keyboard. You can enter data either by typing as normal, or with mouse clicks on the virtual
keyboard.
2 configuring input methods:
In the editor and in GATE Developer’s main window, the ‘Options’ menu has an ‘Input methods’
choice. All supported input languages (a superset of the JDK languages) are available here. Note
that you need to use a font capable of displaying the language you select. By default
GATE Developer will choose a Unicode font if it can find one on the platform you’re
running on. Otherwise, select a font manually from the ‘Options’ menu ‘Configuration’
choice.
3 using the development kit:
GUK, the GATE Unicode Kit, is documented at:
http://gate.ac.uk/gate/doc/javadoc/guk/package-summary.html.
4 reading different character encodings:
When you create a document from a URL pointing to textual data in GATE, you have to tell the
system what character encoding the text is stored in. By default, GATE will set this parameter to
be the empty string. This tells Java to use the default encoding for whatever platform it is
running on at the time – e.g. on Western versions of Windows this will be ISO-8859-1,
and Eastern ones ISO-8859-9. On Linux systems, the default encoding is influenced
by the LANG environment variable, e.g. when this variable is set to en_US.utf-8 the
default encoding used will be UTF-8. When GATE is started using the bin/ant run
command or (on Linux) through the gate.sh script or a link to it, you can change the
default encoding used by GATE to UTF-8 by adding -Drun.file.encoding=utf-8 as a
parameter.
A popular way to store Unicode documents is in UTF-8, which is a superset of ASCII (but can still store all Unicode data); if you get an error message about document I/O during reading, try setting the encoding to UTF-8, or some other locally popular encoding. (To see a list of available encodings, try opening a document in GATE’s unicode editor – you will be prompted to select an encoding.)
1Existing features take precedence over the schema, e.g. those created by previously-run processing resources, are not editable but are not modified or removed by the editor.
2Currently three plugin repositories are listed in the main distribution. To have your repository included in the list send an e-mail with the address to the GATE developers mailing list.
3Gorey details: features of annotations and documents in GATE may be any virtually any Java object; serialising arbitrary binary data to XML is not simple; instead we serialise them as strings, and therefore they will be re-loaded as strings.
4Implemented by Valentin Tablan, Mark Leisher and Markus Kramer. Initial version developed by Mark Leisher.
